
Overview
This Christmas light show marks my first major dive into large-scale lighting design—a journey that took me from small DIY projects to a full-fledged outdoor installation. It all began with a simple Metallica M72 Tour stage replica, where I first experimented with light sequencing. That small-scale project ignited my passion for synchronized light shows, leading me to envision a much larger, immersive, holiday-themed display using xLights software for precise control and synchronization.
However, this project was about much more than just throwing up lights and calling it a day. A significant portion of the work involved overcoming the complexities of mounting, arranging, and setting up an effective light display—skills that required a deep understanding of electrical requirements, structural support, and spatial organization. From dealing with the challenges of mounting props in tight spaces to creating custom designs on a limited budget, the setup itself was a learning curve. The time spent planning the physical layout and ensuring everything was securely mounted, durable, and functional was just as critical as the programming and sequencing of the lights.
Every step involved careful decision-making, from selecting materials to determining the best mounting techniques for different props. With no shortcuts to the intricate work needed for a reliable and efficient display, I faced a series of construction challenges that required both technical knowledge and creative problem-solving. In the end, I overcame these hurdles to build a stunning, weather-resistant display that stood up to harsh conditions and provided a unique, immersive experience for the neighborhood.

Run Rudolph Run
This sequence features “Run Rudolph Run,” performed by Jimmy Buffett, as a tribute to an artist whose music I’ve long loved. I chose this song because of the joy his music has brought me over the years and wanted to honor him with a dedicated sequence. This marks the second song sequence I’ve created for a large-scale show.
What drew me to this track was the rich layering of instruments throughout. The strong rhythm and distinctive musical accents gave me the opportunity to craft bold patterns and synchronized effects across the display. I focused on highlighting multiple instruments to create movement and depth, bringing the music vividly to life through lighting.

He's My Star
This sequence features “He’s My Star” by Poster Children. The song holds special meaning for me because two of the band members were my professors and played a pivotal role in connecting me with the entertainment industry. Through their guidance, I gained incredible opportunities and met many inspiring creatives along the way.
This was the first song I independently sequenced for a large-scale display, and I selected it as my first project as a way to thank my professors for their guidance, mentorship, and continued support.

Wizards of Winter
Originally sequenced by Magical Light Shows, this sequence was imported into my display and extensively customized to fit my layout. Because the original design included more props than I had available, I remapped and redistributed effects to work seamlessly with my configuration. I also enhanced the sequence by adding custom elements, including flood lighting and additional effects, to better complement my setup and overall show design.

80s Mix
Originally sequenced by Magical Light Shows, this multi-song 1980s mix was adapted to fit my display layout. While the overall sequence remained intact, the original design utilized eight melody trees to represent individual notes within the music. I restructured those elements to scale from eight trees down to five, carefully redistributing the melodic mapping so the visual representation continued to align naturally with the music.

Angels - Glory to God
Originally sequenced by Magical Light Shows, this sequence integrated seamlessly into my display and required minimal structural adjustments. I enhanced the design by incorporating custom flood lighting elements. The percussion breakdown features my favorite addition: alternating flood effects across different sections of the house to emphasize the rhythmic dynamics of the music.

John Williams Compilation
Originally sequenced by Magical Light Shows, this medley features a collection of iconic movie themes by John Williams. The sequence was adapted to fit my display layout, requiring the melodic mapping to be scaled from eight trees down to five while preserving the musical clarity and flow. Additional custom elements, such as flood lighting, were incorporated to enhance the overall presentation.

Sarajevo
Originally sequenced by Magical Light Shows, this piece was adapted for my display layout by scaling the melodic mapping from eight trees down to five while maintaining alignment with the music. Custom flood lighting and additional effects were incorporated to enhance the visual presentation.

All Videos
Design Philosophy: Power Management and Light Chain Planning
One of the key aspects of my design process was ensuring that the lights were not only visually stunning but also efficiently powered. I didn’t just chain lights carelessly; I took into account the maximum current output limits of my Falcon F16v5 controller, which is about 5 amps on the 18-gauge xConnect wire. This meant that I had to carefully plan each run of lights, balancing brightness levels and the number of lights chained together.
Brightness and Chaining
The brightness of the lights directly impacts how many I can chain together. The brighter the lights, the less I can chain due to higher current draw. Conversely, dimmer lights allow me to chain more without exceeding the controller’s current capacity. After experimenting with different settings, I decided on a 30% brightness level. This gave me the perfect balance—any brighter, and the lights didn’t show up as well on camera, and they were already bright enough to make an impact. At 30% brightness, I was able to chain up to six strands of lights, running at full white for short periods without exceeding the power limits.
Lower brightness also helped me avoid the need for power injections. I deliberately chose not to use power injections because they add more wires than necessary and require special care to ensure I don’t accidentally inject power into the wrong string—especially critical when strings are split across different power supplies. Avoiding injections kept the setup simpler, safer, and more manageable while still providing enough power for all strands.
Controller and Modularity
I built my own enclosure for the Falcon F16v5 rather than buying a prebuilt one. Sourcing the parts myself was more cost-effective and gave me flexibility to have two power supplies to split the load instead of relying on one massive supply. It also gave me the option to integrate a mini speaker amplifier in the same enclosure.
All the main light runs came directly from the controller and were carefully planned to use the fewest runs possible while maximizing the number of lights per chain based on location. The only exception was the mega tree, which uses a single Falcon smart receiver to provide the additional channels it needed, along with its own dedicated power supply. This allowed the tree to operate independently without complicating the main controller setup.
Optimizing Layout and Efficiency
In the garage, I started with a rough calculation that six strands of lights would fit perfectly and conform to the space, balancing both power usage and spacing. However, as I continued refining the design, I realized I needed extra lights for a different section of the show. Instead of buying more lights, I looked at what I already had and thought about how I could make the design more efficient.
After reworking the setup, I found that I could drop an entire strand from the garage and still fit all the pixels I needed. This adjustment allowed me to reallocate those lights to another part of the display, making the most of my existing resources and reducing unnecessary wiring. By consolidating the design, I optimized my current setup and kept things streamlined, all without needing to purchase extra materials.
Creative Solutions for Mounting Lights and Structures
1. Using PVC Pipes for Efficient Mounting:
When it came time to mount lights along the edges of the house and garage, I initially considered purchasing additional channel strips online. These strips were perfect for ensuring the lights were evenly spaced, but the high shipping costs made it impractical to buy more. Instead, I decided to reuse the channel strips I already had for other areas of the display and created an alternative mounting solution.
I turned to PVC pipes. While some DIYers use PVC as the channels for their lights, I decided to use it differently—as a structural framework to keep the light strings straight and aligned. This approach created a stable, straight line for the lights, making installation faster and more efficient. It also reduced the number of hooks needed and kept the lights perfectly positioned, preventing them from drooping or shifting in windy conditions.
Although PVC worked well as a framework, I wanted to explore a more flexible and accessible alternative for the channel strips themselves, which led me to consider garden plastic edging from the hardware store.
2. Garden Plastic Edging for Window Frames:
For framing the windows, I took advantage of garden plastic edging, which I found on sale at a local hardware store. The black color of the edging matched the window frames, allowing for a seamless integration with the house. However, the material came rolled up, which caused it to curl back when unrolled. This presented a challenge, but I found a simple solution by zip-tying the edging to PVC pipes along the window frames. This helped maintain a neat, uniform frame and secured the edging tightly in place, ensuring a clean and polished look—an approach that would later influence some of the solutions I used on larger parts of the display.
Construction Hurdles: Trees, Arches, and Custom Props
While mounting lights along the house and garage was relatively straightforward, mounting props like trees and arches in front of the house presented several challenges. The area had a large sidewalk, as well as bushes and rocks in the yard, making it impossible to stake the props directly into the ground. With no access to lifts or traditional mounting points, I had to get creative.
3. Mounting Trees and Arches on the Sidewalk:
To mount these props securely on the sidewalk, I devised a solution involving wooden beam structures. These beams were built to support each prop, ensuring that they stayed upright and didn’t tip over. I used sandbags to weigh down the base of the beams, which helped stabilize the props and prevent them from shifting or falling during gusty winds. The sandbags acted as counterweights, ensuring that even large props stayed secure in their spots.
Since the trees were handmade, I needed to reinforce them further to prevent them from swaying in the wind and potentially breaking. To do this, I added wood dowels inside the frames of the trees to provide rigidity and strength. The dowels prevented the trees from bending or snapping under the pressure of strong gusts, making them much more durable and stable.
4. Creating the Mega Tree
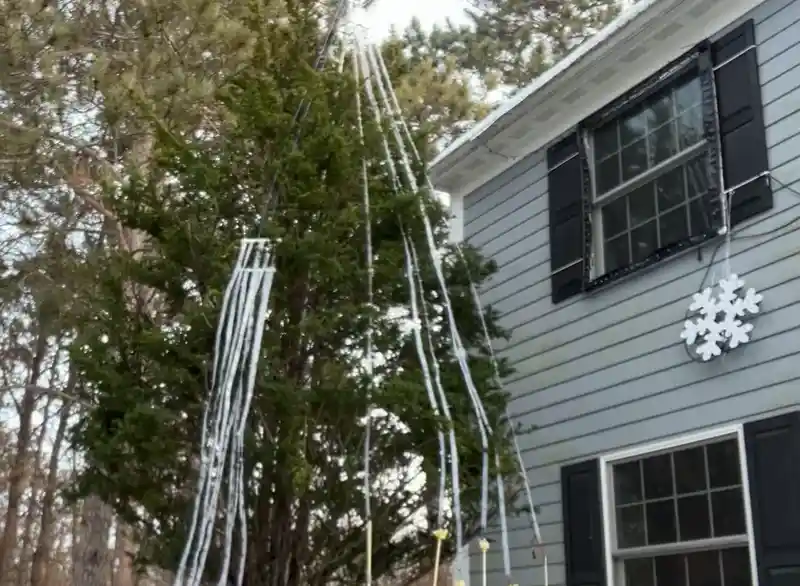
One of the most challenging and rewarding aspects of my display was building the mega tree. The only place that made sense for it in my show was a spot where a large bush was already standing. However, given it was winter with snow, cutting down the existing tree was out of the question—not only because of the conditions but also because I wanted to preserve the bush for future seasons. Without access to special equipment like a boom lift truck to reach the top, I had to come up with a creative solution to mount the lights.
I knew I needed to take advantage of the existing tree’s structure, but there was a catch: my ladder could only reach about halfway up the trunk before it became too thin to safely hold it. So, I decided to merge a traditional mega tree design with the existing tree.
The solution involved running a tall pole from the ground to the top of the tree’s center. This pole acted as a sturdy anchor point, much like it would in a concrete foundation. To secure the pole, I used ratchet straps to tightly fasten it to the base of the tree, making sure it wouldn’t move or shift.
At the top of the pole, I installed pulleys, which allowed me to hoist the lights into place. The process was pretty labor-intensive, but it worked: I attached all the lights at the bottom, then used the ropes to pull the entire string up to the top of the tree. The tree itself had a strange shape, with the stump standing about 6 feet tall before the leaves started, which made reaching the top even more challenging. Despite this, the system I devised allowed me to work around these hurdles and create a towering centerpiece for the display.
Custom Channel Strips
For the channel strips on the mega tree, I used large plastic sheets, about 1 by 4 feet, to cut my own strips. Unlike the garden edging used on the windows—which comes rolled up and naturally wants to curl back, requiring PVC to hold it straight—these sheets needed to remain flexible on their own. I didn’t use PVC, because I wanted the strips to drape naturally along the tree rather than being rigid or constrained. This flexibility was essential for the lights to hang smoothly without putting stress on the strands.
The process was labor-intensive. I drilled all the holes carefully using multiple drill bits to prevent blowout and cut each sheet individually. I could cut two sheets at a time, but trying more than that didn’t work well with shears. Although I had an electric metal shear, it wasted too much material, which limited how many strips I could get from each sheet.
Each strip was 1 inch wide, giving me 12 strips per sheet—enough to fit three strands of lights. Despite the effort, creating these custom strips allowed me to maintain the flexibility I wanted while keeping the mega tree neat and professional-looking.
5. Reinforcing Custom Props with Dowels and 2x4s:
The thin coroplast I used for the custom trees and mega snowflake presented another challenge. The coroplast I could find at my local hardware store was much thinner and flimsier compared to the thicker, more rigid commercial props I had purchased. To address this, I had to reinforce the props with additional materials.
For the mega snowflake, I mounted a 2x4 behind it for added structural integrity. This reinforcement prevented the snowflake from swaying or flapping in the wind. I also secured the corners of the snowflake with string to keep the edges taut and reduce the risk of them bending or blowing in the wind. The string acted as an additional safeguard to ensure that even if one part of the frame shifted, the snowflake would stay intact and won’t get damaged.
For the trees, I relied on the wood dowels mentioned earlier. These were inserted into the coroplast panels to give them enough rigidity to stand up to high winds and prevent the trees from collapsing or breaking. This extra step was crucial, as the wind was a constant concern, especially with tall, narrow props like these.
6. Fabricating Custom Snowflakes and Trees:
In addition to mounting challenges, I had to create the props from scratch. I wanted a mega snowflake and five custom trees for the display, but purchasing pre-made props was far too expensive. To save costs, I decided to fabricate my own props.
Using a vector design program, I created a template for the trees and snowflake. The tree templates were small enough to be printed on blueprint paper, which I had printed at a nearby print shop. However, the mega snowflake was far too large to print as a single design. At 47x47 inches, it was simply too big for my printer.
To work around this, I broke the design into smaller sections—11x8.5 inches—so I could print it on standard-sized paper. I then taped the sections together to form the full design. While the process of printing and assembling the snowflake was time-consuming, it ultimately allowed me to build a prop that was both cost-effective and visually impressive.
7. Labor-Intensive Fabrication:


The fabrication of these props was incredibly labor-intensive. I had to work carefully with drill bits of varying sizes to prevent blowouts while drilling holes in the coroplast. This process required a lot of patience and precision. I started with smaller bits and gradually worked my way up to larger ones to ensure the holes were smooth and clean. The template I had created helped me trace the correct shapes and guide the cuts, but the drilling and assembly still took several hours of manual labor.
Once the drilling was done, I had to cut the panels using hand shears since the power tools would have removed too much material and affected the precision of the cuts. The final result was a collection of custom props—trees and a mega snowflake—that were not only durable but also highly personalized for the show.
Over-Engineering the Snowflakes: Ensuring Stability and Safety
Since the snowflakes were some of the heaviest props in the display, I knew I needed to over-engineer their mounting system to ensure they would stay secure in high winds.
8. Double Hook System for Snowflake Mounting:
Instead of using just one hook to support the snowflakes, I used two hooks to distribute the weight more evenly. This minimized the strain on a single hook and helped reduce the risk of failure. To further stabilize the snowflakes, I added a third hook at the bottom, which kept the props from flapping or swaying in the wind. This triple-hook system ensured the snowflakes would stay firmly in place throughout the holiday season.
9. Safety Line for Backup:
In addition to the double-hook system, I also installed a safety line running from the snowflakes to the window shutters. The safety line acted as a fail-safe, ensuring that if the hooks did fail, the snowflakes wouldn’t crash to the ground. The safety line didn’t bear any weight during normal conditions, but it provided an extra layer of security to prevent damage to the props or surrounding decorations.
Dealing with Weather: Durability in Harsh Conditions
The winter conditions in my area can be brutal, with temperatures regularly dipping into the negatives and wind gusts reaching up to 70 miles per hour. We’ve had some serious wind storms that really tested the durability of the display. Given these extreme conditions, I knew that durability would be key to the success of the show.
From using adhesive hooks to securely hold lights to relying on PVC pipes to keep everything straight, I focused on ensuring that every component could withstand the elements. The sandbagging technique for the sidewalk props worked flawlessly, preventing them from tipping over even during the strongest gusts.
The double hook and safety line systems for the snowflakes provided the added stability needed to weather the storms. However, the biggest overall success was definitely the hooks. These turned out to be more cost-effective than the larger outdoor command hooks, as they came in bulk at a reasonable price. They held up incredibly well, withstanding the intense wind and extreme temperatures throughout the show season—proving to be a reliable and essential part of the setup.
Final Thoughts: A Successful and Resilient Display
After months of planning, fabrication, and installation, the light show was finally up and running. The creative solutions I implemented—from PVC pipe frameworks to reinforcing custom props with wood dowels and 2x4s—ensured that the display was not only visually stunning but also structurally sound. The use of sandbags for added stability and the over-engineered snowflakes helped the props withstand harsh winds and freezing temperatures, making the display a success throughout the entire season.
Throughout the project, I encountered several hurdles that required both problem-solving and careful planning. Whether it was mounting lights on a large, existing tree or fabricating custom props from scratch, each task presented its own set of challenges. I had to find efficient ways to maximize power output without overloading circuits, carefully plan my light runs to reduce waste, and come up with creative mounting solutions in tight or difficult spaces. Every decision, from choosing the right materials to optimizing light placement, required balancing multiple factors like durability, cost, and ease of installation.
A key part of overcoming these challenges was being resourceful and not shying away from complexity. I was able to tackle these obstacles through a mix of patience, careful planning, and adaptability. In the end, the effort paid off, resulting in a display that was not only visually impressive but also structurally resilient—built to last through extreme weather and stand up to the rigors of the holiday season.
This project has taught me valuable lessons in problem-solving, material selection, and construction techniques, all of which will be crucial as I take on even more ambitious projects in the future.
Key Takeaways
- Creative Problem-Solving: Overcoming a variety of construction and mounting challenges, from working with existing structures to custom fabricating props, required innovative solutions and careful consideration of each task’s unique requirements.
- Detailed Planning and Efficiency: Maximizing the efficiency of light chains and power usage was crucial to keeping the setup simple and effective. I carefully calculated power loads and planned light runs to avoid unnecessary materials, reducing waste while optimizing performance.
- Durability in Harsh Conditions: The display was designed with extreme weather in mind. Using reinforced structures, over-engineered mounting systems, and reliable materials helped ensure that everything stood up to harsh winds and freezing temperatures.
- Resourcefulness and Adaptability: Whether it was designing a mega tree or fabricating custom props, each challenge required adaptability and resourcefulness. Using available materials and thinking creatively allowed me to find solutions and keep the project on track.
- Learning and Growth: The project was a significant learning experience, teaching me valuable lessons in construction, planning, and problem-solving that I can apply to future, even larger, projects.
Looking Forward
This project was a major stepping stone in my journey as a lighting designer, pushing me to think critically about every aspect of the display—from planning and construction to power management and mounting solutions. The challenges I faced helped me develop a deeper understanding of what’s involved in large-scale installations and how to tackle unexpected hurdles.
As I look to future projects, I’m excited to apply the lessons I’ve learned, from careful planning and resourcefulness to refining my designs for even more ambitious displays. I’m eager to experiment with new techniques, explore more complex designs, and push the boundaries of what’s possible with lighting. Each project provides new opportunities to innovate, and I’m ready to take on even bigger challenges with the knowledge and experience gained from this one.